Categories
Windows windows 10 Windows 10 Tweaks

Hiding The Weather/News and Interests Icon

A SIMPLE GUIDE

How To Hide The Weather/News and Interests Pop-Up.

This guide shows you an easy way on how to hide the weather/news and interests pop-up.

Step one

news weather icon
news and interests expanded options

Locate this icon which is bottom right area and right click on an empty space of the task bar.

A menu like this should appear, hover your mouse over the “News and Interests” area. For the tutorial, we labelled the area as 1.

You should now see a smaller menu pop up. We want to turn the news and interests icon off so make sure to click it in the smaller menu, we labeled this as 2. 

Now you are all done! Now The icon will disspear and you will find no more frustration with it.

Categories
Windows windows 10 Windows 10 Tweaks

How To Make Your Computer Seem Faster Without An SSD

A STEP BY STEP GUIDE

How To Make Your Computer Appear Faster Without An SSD

In this tutorial we show you how to make your computer appear faster without an SSD. If an SSD upgrade is out your price range then these tricks can help make your computer feel snappier. 

Step one

windows button start menu

Go ahead and open the start menu, it will look like the Windows icon. It’s at the bottom left hand corner of your screen.

Alternatively you can press the Windows key on the keyboard.

Step two

ajust the appearance and peformance of windows

Start typing “Adjust the appearance and peformance of windows” in the area where the arrow points to in the picture. Soon the option for it will show like in the picture to the left.

A window called “Peformance Options” like the one shown in the picture to the left will pop up. Make sure these three options are selected;

“Show thumbnails instead of icons”

“Smooth edges of screen fonts”

“Use drop shadows for icon labels on the desktop”

Also make sure the other options are unselected and be sure to click “apply” too.

Now the next way is only really a solution if you have programs that pop up each time you turn your computer on. Those programs can make your computer appear sluggish.

option two - Step one

We need to get to the “Task Manager” so to do that you need to click “Ctrl”, “Shift” and “esc”. All These keys are up along the left hand side of the keyboard and all the relevant ones are circled in red in the picture to the left.

Step two

Now you can ignore everything on this page currently except the tabs along the top of the window. Follow them along until lyou see one named “startup”. Click that tab, it is circled in red.

Once you click on the “startup” tab, a screen like this will appear and the only difference being the programs on your screen may be different. Now you can start thinking “what apps pop up whenever I start the computer?”

Step three

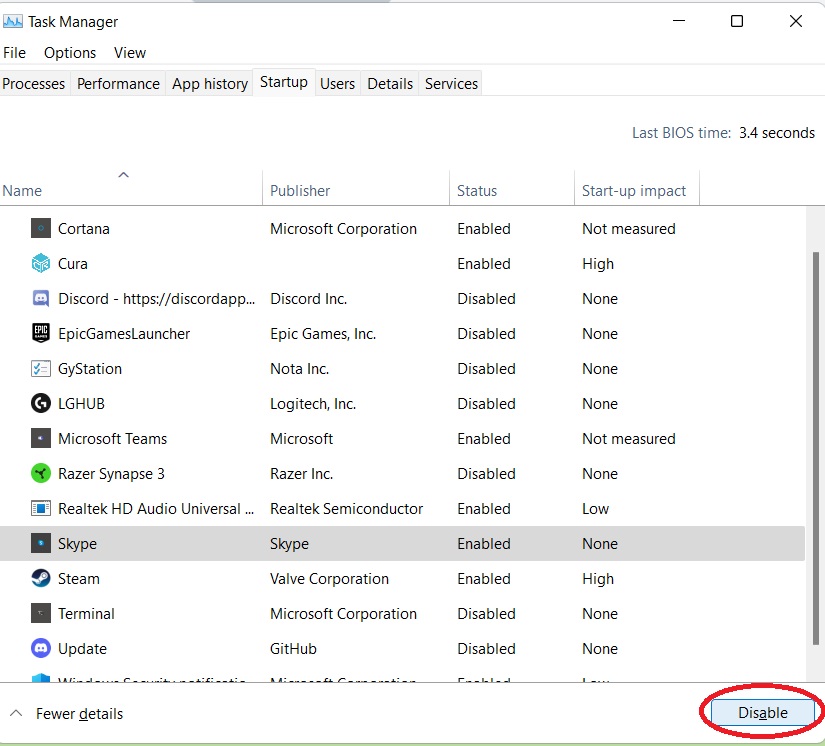
For example; if Skype always opens, you click on “Skype” in the list then the “disable” button which is shown in the circled area at the bottom right corner.

Don’t worry, disabling the program won’t uninstall it but it will simply tell the computer not to open the program up when you turn your computer on.


You can also repeat these steps for the likes of Google Chrome and Microsft Edge. If you are having any issues, you can download our remote tool or pop into the shop. These are two little tricks that will help make your computer appear snappier and a little smoother.

Categories
Uncategorized Windows windows 10 Windows 10 Issues

Fix Windows Update issues

The Step by Step guide on how to

Fix Windows Update issues

In this tutorial, we will teach you some ways in which we fix windows update issues with only a few commands

Fix Windows Update issues

Step one

windows button start menu

Go ahead and open the start menu, it will look like the Windows icon. It’s at the bottom left hand corner of your screen.

Alternatively you can press the Windows key on the keyboard.

Step Two

How to get to CMD
Right Clicking on CMD

Start typing “CMD”.

CMD is just shortened for “Comand Prompt” but we type it like that to get to it quicker.

It will appear like this, Once you have done that, right mouse click it and a smaller menu should appear. 

Once the menu appears it will have a few options. Click the first one, it will say “Run as administrator”.


A seperate window will pop up asking “do you want to allow this app to make changes to your device?” Select “Yes”


Step Three

A window like this will appear.

in that window, start typing:

sfc /scannow

and then press the “enter” key on the keyboard.

Step Four

This is what the scan looks like while it is running, it may take some time so don’t worry if it seems like it has stopped and you can always press the “enter” key if it seems stuck.

Step Five

Occasionally, the scan may come back with no issues found within the system. 

Although sometimes it may say it cannot repair corrupt files, look below for a fix on that.

What to do if SFC/Scannow says "Windows Resource Protection found corupt files but was unable to fix some"

Windows Resource Protection Found Corrupt Files but Could Not Fix Them

If this happens to you, fear not as we have another trick you can try.

Step one

DISM Cleanup Image Command Start

Follow the tutorial to get the Comand Prompt (CMD) open again if you have closed it off.

Once you have CMD open, start typing;

DISM /Online /Cleanup-Image /RestoreHealth

And then press the Enter button on the keyboard. The image to the left shows what it should look like when it has been written.

Step two

Dism Cleanup Image Scan Progressing

This is what it will look like as it is progressing. The Percentage bar may progress slowly but that is ok as it will be doing it in the background.

This is what it will look like when the command has completed.

Close off the CMD window and try doing Windows updates again.

Categories
Uncategorized Windows windows 10 Windows 10 Tweaks

Hide the windows 10 search bar

The Step by Step guide on how to

Hide The Windows 10 Search Bar

Gain more space on the taskbar by following this guide to hide the windows 10 search bar, also find out how to show it again if needed

Windows 10 search bar

Step One

hide Windows 10 Search bar and Task bar

Start by either finding the search bar or some blank space between your icons on the taskbar.

Move your mouse there and right-click, then move on to the next step.

Step Two

You should see this menu pop up above where you right clicked.

Stick your mouse over search near the top there and a sub menu will appear.

“You will also see some other options you may want to play with”

Step Three

search bar hidden

You will see more options pop up to the side.

Left click hidden to hide it or you have two options for showing it.

“Show Search icon” is a smaller magnifying glass icon that does not take up much room, or “Show Search Box” is your regular one.

Done

That’s you done, Just repeat the steps above to get it back if you need to.

Now you can pin way more programs and have a less cluttered desktop!

Categories
Windows windows 10 Windows 10 Issues

fix Windows WiFi issues

The Step by Step guide on how to

Fix windows WiFi Issues

Your WiFi can play up in may differant ways but this tutorial is what we use as our catch all fix Windows WiFi issues 90% of the time

fix Windows WiFi issues

If your WiFi is dropping out or telling you it can’t connect then resetting the WiFi adapter is often the best solution.

Do you see errors like Connected Not Secured, No Connections available, cant connect to this network or even no wifi symbol at all?

Then continue on below the tuorial awaits.

“Disclaimer: This will remove all saved networks so have your WiFi/Router password handy at the end”

Step One

First we need to open the device manager, if you have never used this before it may look a bit scary but we will hold your hand.

windows button start menu

Find the windows button, usually at the bottom left and stick your cursur over it.

then you want to RIGHT Click not left cick as you may usually do.


This Menu will popup, it gives you quick access to a few common windows things, we are looking for device manager.

Left click on that and head over to step two.


Step Two

Once device manager loads, about halfway down you will find “Network Adaptors” click the little arrow to the left and it will expand like the picture.


Device Manager network

Now heres where yours may differ, we need to find your WiFi adaptor, it could have a few names but the keywords to look out for are

  • WiFi
  • Wireless
  • 802.11n

Once you have determined which one is related to your WiFi Right click it. Then select uninstall device, then uninstall at the next prompt.

It should then take you back to the same list minus the one we just unnstalled, now onto step three.

‘Pro tip These are called drivers incase you didnt know, they are peices of software that speak to the hardware in your computer’

Step Three

You now want to restart your computer which will force windows to reaquire your WiFi Drivers aswell as any settings attatched to them

wifi icon
windows 10 wifi list

Once The computer has restarted we need to recconect to your WiFi, Click the WiFi icon in the bottom right, this usually looks like a little globe if you dont have any current connections.

Find your network click on it then click connect, this is where it will ask you for your WiFi password, so go grab that from the back of your router if you havent already, input and hit Next.

In theroy that should be it, will hopefully work fine now. If not then it may be something else. you can contact us at the bottom of the page if this didnt work and we can help you further.